Maintaining your roof flashing is vital to prevent water damage and protect your Lewisville business. Regular inspections help identify early signs of deterioration, saving you money and stress down the line. Proper repairs ensure your roof stays watertight and lasts longer, but knowing where to start can be challenging. To keep your property safe and secure, understanding the best repair practices is essential—so, let’s explore the key steps involved.
Identifying Signs of Damaged or Deteriorated Flashing
Damaged or deteriorated roof flashing often shows itself through visible signs on your building’s exterior. Common causes include weather exposure, age, and poor installation, which can lead to cracks, rust, or missing sections.
As you inspect, look for visual indicators like dark streaks or water stains near roof joints, especially around chimneys, vents, or skylights. Loose or lifted flashing might be apparent if you notice gaps or curled edges.
Damaged flashing can also cause shingles to loosen or shift, revealing further signs of deterioration. Regularly inspecting these visual cues helps you catch problems early, preventing leaks and costly repairs.
Understanding roof flashing and its importance can help you identify issues before they escalate. Recognizing these signs is essential for maintaining your building’s roof integrity and ensuring your business remains protected from water damage.
Gathering the Necessary Tools and Materials for Repair
Before you start repairing roof flashing, gather all the tools and materials you’ll need to work efficiently and safely. Proper material selection is vital; choose weather-resistant flashing, sealants, and nails suitable for your roof type.
Make sure you have a utility knife, hammer, caulking gun, and a pry bar for removal and installation. Calibrate your tools, like adjusting the caulking gun pressure, to guarantee clean, even application.
Double-check that your ladder is stable and your safety gear, such as gloves and goggles, are ready. Having everything on hand prevents unnecessary trips and helps you stay focused on the task.
Careful preparation of tools and materials streamlines the repair process and guarantees quality, lasting results.
Preparing the Work Area and Ensuring Safety
To guarantee a safe and efficient roof flashing repair, you need to prepare the work area carefully. Clear the area of debris, tools, and any obstructions that could cause accidents. Make sure the work area is stable and free of hazards, such as loose shingles or slippery surfaces.
Before starting, put on your safety gear, including a harness, gloves, goggles, and a helmet, to protect yourself from potential falls and injuries. Secure tools and materials to prevent them from falling off the roof.
If you’re working on a ladder, ensure it’s on stable ground and properly positioned. Taking these precautions minimizes risks and helps you focus on the repair process efficiently and safely.
Removing Old or Damaged Flashing Properly
Since removing old or damaged flashing is essential for a proper repair, you should carefully detach it from the roof without causing further damage.
Different flashing types, like metal, vinyl, or asphalt, require specific removal techniques. For metal flashing, use a pry bar to gently lift the edges, avoiding bending or warping the material.
Vinyl flashing can often be peeled away carefully by hand or with a putty knife. Asphalt flashing may need to be cut away with a utility knife.
Always work slowly to prevent damaging the surrounding roofing materials. Removing damaged flashing thoroughly ensures a clean surface for the new installation and prevents leaks.
Taking your time with proper removal techniques will make the overall repair process smoother and more effective.
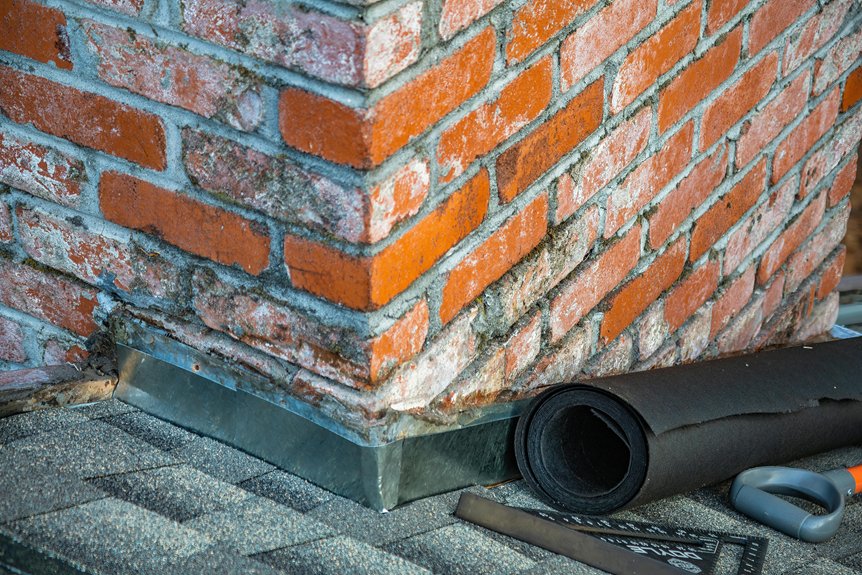
Installing New Flashing to Seal Joints Effectively
Once you’ve removed the old or damaged flashing, the next step is to install new flashing that effectively seals the joints. Choose high-quality flashing materials such as aluminum, copper, or galvanized steel, which resist corrosion and provide a durable seal.
Make certain the flashing fits snugly over the joints and extends slightly under the roof ventilation components to prevent leaks. Proper placement is essential; the flashing should direct water away from seams and overlaps.
Secure the flashing with appropriate fasteners, avoiding over-tightening that could damage the material. Take care to align the flashing properly along the roofline and around vents, ensuring a tight seal.
Well-installed flashing prevents water infiltration and prolongs the roof’s integrity, keeping your Lewisville business protected from the elements.
Applying Sealant and Ensuring a Watertight Fit
Applying sealant correctly is essential to guarantee your flashing remains watertight. During sealant application, ensure the surface is clean, dry, and free of debris.
Use a high-quality, compatible sealant designed for roofing to create a reliable barrier. Apply the sealant evenly along the edges of the flashing, pressing it into all seams and joints.
Be careful to avoid gaps or air pockets, as these can compromise the watertight fit. Once applied, smooth the sealant with a caulking tool or your finger to ensure full contact and a seamless seal.
Proper sealant application forms a durable, waterproof barrier that prevents leaks and protects your building. Remember, a well-sealed flashing system is key to long-lasting roof integrity.
Scheduling Regular Inspections and Maintenance
Regular inspections and maintenance are crucial for catching potential roof flashing issues before they cause costly damage. By scheduling regular check-ups, you can identify loose, cracked, or corroded flashing early, preventing leaks and structural problems.
These inspections help confirm your roof remains in compliance with roofing warranties, which often require documented maintenance. Additionally, staying proactive simplifies insurance claims if damage occurs, as you’ll have proof of ongoing care.
During inspections, verify that flashing is securely sealed and properly aligned. Regular maintenance also includes cleaning debris and reapplying sealant when necessary.
Staying consistent with inspections reduces unexpected expenses and extends your roof’s lifespan, giving you peace of mind and protecting your investment. Don’t wait—schedule routine inspections today.
Conclusion
Regularly inspecting and maintaining your roof flashing keeps water out and protects your Lewisville business. By spotting signs of damage early, using quality materials, and following proper repair steps, you prevent costly leaks and extend your roof’s lifespan. Prioritize safety and schedule routine check-ups to catch issues before they worsen. Staying proactive guarantees your business stays dry, secure, and operational without interruption—saving you time and money in the long run. For more information on how to schedule your free roof inspection, call us at (405) 543-2920 or visit us online at Top View Roofing.